
Do you want to avoid struggling with bulky backdrops that take up too much space and are a hassle to transport? Well, fret not! This article will share easy and efficient ways to fold a backdrop to make your photography sessions a breeze.
Whether you're a professional photographer or a hobbyist looking to elevate your shots, mastering the art of backdrop folding will save you time, space, and frustration. Say goodbye to wrinkled and tangled backdrops and say hello to seamless and professional-looking setups. Let's dive in and learn the simple yet effective techniques to fold a backdrop like a pro!
Key Takeaways
- Lay the backdrop flat to smooth out any wrinkles or creases.
- Fold one side towards the center, then repeat with the other side.
- Fold the top edge, aligning it neatly to maintain an even fold.
- Add a slight twisting motion with each fold to help the backdrop fit compactly.
- Store the folded backdrop in a dry, clean area to prevent damage.
Prepare Your Backdrop Before Folding
To prepare your backdrop for folding, start by gently tugging away any wrinkles or creases in the fabric. If you have stubborn wrinkles, a fabric steamer is your best bet. It will relax the fabric quickly without harming it.
Iron the backdrop for those deeper creases. Just make sure you set the iron on low heat and do it gently to avoid any damage.
Before you start folding, hang the backdrop for a bit. This helps any lingering wrinkles fall out naturally. Most importantly, ensure the backdrop is completely dry. You want to avoid folding it up damping, as that could lead to mildew or other damage.
How to Fold a Backdrop: Muslin and Canvas Backdrops

Folding a muslin or canvas backdrop properly can help minimize wrinkles and damage. Here’s a straightforward method you should know to fold your backdrop:
- Clean the Area: Ensure the area where you plan to fold the backdrop is clean to avoid getting dirt or stains on the fabric.
- Lay the Backdrop Flat: Spread the backdrop out on a flat surface. Try to smooth out any wrinkles with your hands.
- Fold Lengthwise: Start by folding the backdrop in half lengthwise. Depending on its size, another person might need to help you. Smooth out the fabric as you go.
- Repeat Lengthwise Fold: Continue to fold the backdrop in half lengthwise until it reaches a manageable width. Each time you fold, smooth out the fabric to minimize wrinkles.
- Fold Widthwise: Once the backdrop is manageable, begin folding it widthwise. Fold it in half, smooth out the fabric, and then fold it in half again. Continue this process until the backdrop is completely folded into a compact size.
- Store Properly: Store the folded backdrop in a dry, clean place. Use a storage bag to protect it from dust and moisture if possible.
Following these steps, you can fold your muslin or canvas background neatly, making it easier to transport and store.
How to Fold a Backdrop: Collapsible Backdrops
Folding a collapsible backdrop properly can extend its lifespan and make it easier to transport and store. Here’s a simple step-by-step guide on how to do it:
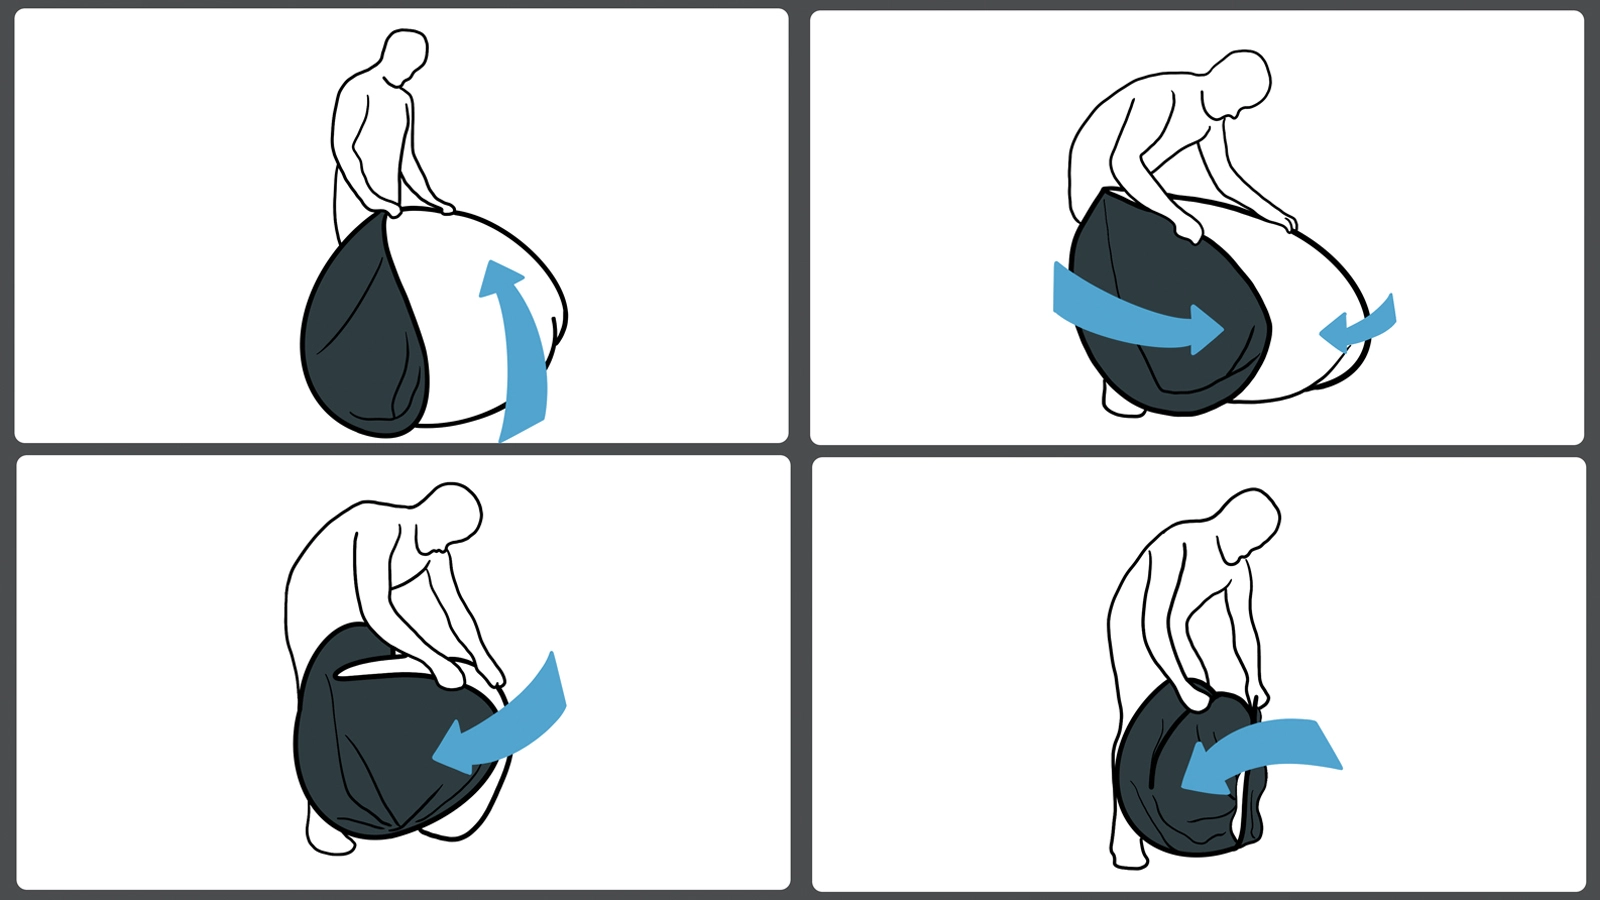
- Stand Up and Hold the Backdrop: Stand the backdrop on its edge and hold it from the sides.
- Collapse the Sides: Gently push the sides of the backdrop towards each other. Most collapsible backdrops have a flexible frame that will start to fold as you apply pressure.
- Form a Figure 8: As the sides come together, manipulate the shape into a figure 8. Ensure you are not using excessive force, which might bend or break the frame.
- Fold into a Circle: Once the backdrop is in a figure 8 shape, continue guiding the material so that one loop of the 8 lays down on the other, forming a circle.
- Secure the Folded Backdrop: Many backdrops come with a strap or a case. Secure the backdrop with the strap or slip it into its case to prevent it from unfolding.
- Store Properly: Store your backdrop in a cool, dry place to avoid moisture damage or warping.
This method works for most round, collapsible photography and video production backdrops. Be sure to handle the material gently to avoid any tears or damage.
How to Fold a Backdrop: Seamless Paper
Folding seamless paper properly can help maintain its usability and prevent damage. Here’s a simple guide on how to do it:
- Clean the Area: Ensure the area where you're folding the paper is clean to avoid dirt and debris that can scratch or mark the paper.
- Lay It Flat: Spread the seamless paper out on a flat surface. You might need an extra pair of hands to help if it's a large roll.
- Start at the Ends: Begin at one end of the paper and make a soft fold, not a sharp crease, about every two feet. Continue this along the length of the paper.
- Alternate Fold Directions: To minimize bulk and avoid creating hard creases, alternate the direction of each fold. Fold one section under and the next over.
- Secure Gently: Once fully folded, secure the paper with soft fabric tape or a rubber band that won’t damage it. Avoid using anything sharp or overly tight.
- Store Horizontally: Store the folded paper flat or horizontally in a dry place to avoid bends or warping over time.
This method helps you fold and store your seamless paper efficiently without causing damage or permanent creases.
Tips for Storing the Backdrop
Ensure you place the folded backdrop in a dry, clean area to prevent damage and maintain its quality. It's wise to use a carrying case or bag specifically designed for backdrops. This extra protection helps during transportation and storage, safeguarding against dirt and creases.
Make sure you store the backdrop away from direct sunlight and high temperatures, as these can cause the colors to fade and the material to warp. Additionally, keep it clear of sharp objects or rough surfaces that could tear or puncture the fabric.
Regular checks for any signs of wear or dirt are vital. Addressing these issues promptly will help ensure the backdrop's longevity and readiness for your next shoot.
Troubleshooting Common Issues
When you're folding your backdrop and notice wrinkles or creases forming, don't panic.
If the material gets damaged during the process, assess the extent and consider whether a professional repair might be needed.
These issues can often be managed with careful adjustments and patience during your next folding attempt.
Addressing Wrinkles and Creases
To effectively tackle wrinkles and creases, use a steamer or set your iron on low heat to gently smooth out the fabric.
When dealing with backdrop fabric, it's crucial not to let wrinkles set in deeply. After unfolding, hang the backdrop overnight. Gravity will help eliminate minor creases.
If you're folding the backdrop for storage, avoid using the same folds repeatedly, as this can deepen creases. Instead, consider rolling it or investing in a proper storage system to minimize damage.
Storing your backdrop in a cool, dry place also helps prevent excessive wrinkling and creasing, keeping it ready for your next use without hassle.
What to Do If the Backdrop Gets Damaged During Folding
If your backdrop is damaged during folding, first assess the severity of the damage. Minor tears or creases might need some gentle smoothing out.
For larger tears, consider using fabric glue or a patch to reinforce the backdrop. This can prevent further damage and extend its lifespan for future photography sessions. Always handle the backdrop carefully during this process to avoid worsening the issue.
If the damage is beyond your repair skills, it is wise to seek professional services. This ensures your backdrop returns to perfect condition, ready for your next photo or YouTube shoot.
Conclusion
Now that you've mastered folding different types of backdrops, remember to keep them clean and dry before you start. Proper folding extends the life of any backdrop, whether it's muslin, canvas, collapsible, or paper, and keeps it ready for your next shoot.
Store them in a cool, dry place away from sunlight. If you run into any issues, revisit the specific folding techniques. With these tips, you'll keep your backdrops looking professional and pristine for years.